We’re officially in springtime, which not only means the return of birds and warmer weather, but it also signals the beginning of spring cleaning season! It’s likely that after this previous winter, your home could use some extra attention, so follow these actionable spring cleaning tips to ensure that your home is as clean as possible without getting overwhelmed!
1. Clean Room by Room
As you begin to inspect your home and prepare for spring cleaning, it’s easy to get overwhelmed at all of the jobs in front of you. Each room needs a lot of TLC, from the bedrooms and living room to the bathroom, kitchen, and even hallways.
To avoid getting stressed out at the mounting list of tasks to complete, try to keep your spring cleaning to one room at a time. Focus on your bedroom, then move over to the adjacent guest bedroom. Only after completing those rooms should you begin tackling your kitchen.
Allowing your brain to compartmentalize each room’s jobs, one by one, is a fantastic way to stay on task without becoming frustrated or submerged by the large list of cleaning jobs you still have to complete.
2. Clean from Top to Bottom
When you’re cleaning a room, you might be tempted to first remove all of the clutter from the floor. However, at Junk-A-Haulics, we’d like to convince you otherwise. While it can make some sense to begin at the floor and work your way up, it’s much more actionable to begin at the ceiling and work your way down.
Start each room by dusting the walls, starting at the ceiling and working your way down. Make sure to spend some time cleaning your ceiling fan with a microfiber cloth! Our fans are often overlooked, but they quickly build up an abundance of dust. Once the walls are complete, you can begin tackling the clutter on the floor and cleaning the elements of the room itself.
In cleaning from top to bottom, you’re eliminating the possibility of having to reclean or redust your rooms. If you started on your floor and worked your way to the room’s ceiling, you could find yourself pushing dust onto the newly cleaned floor, having to vacuum it again. Make your spring cleaning more efficient by cleaning each room from the top down!
3. Inspect Your Cleaning Supplies
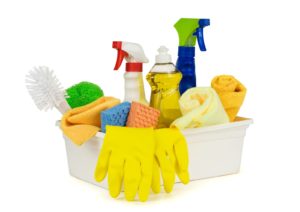 As you begin cleaning your home for the spring season, it’s important to take a close look at your current cleaning products. Not only do you want to make sure that you have enough product to complete the whole project (nothing kills spring cleaning motivation like having to pause to run to the store for more cleaning agents), but that you’re avoiding unnecessary chemicals.
Remember, while some product’s chemicals are unavoidable, many can be supplemented for products you already have at home like a sprinkle of baking soda or warm soapy water.
4. Don’t Forget About Your Trash Cans
It might seem silly to worry about cleaning your trash cans but think about how much gross, sludgy action they see on a yearly basis. They could certainly use, at the very least, an annual cleaning.
To clean your garbage cans, thoroughly spray them with a hose and pour out the water. Next, you’ll want to use a disinfectant spray to scrub them. Finally, let them air dry upside down.
5. Use Your Vacuum’s Attachments to Your Advantage
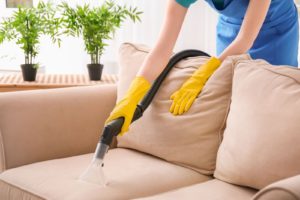 If your vacuum came with various attachments, you should absolutely be taking advantage of them throughout your spring cleaning process. An upholstery attachment can make cleaning furniture a breeze; simply run it over your furniture and watch the dust, dirt, crumbs, and pet hair be removed. Your vacuum’s extension wand is great for tackling corners and hard to reach crevices.
6. Your Lint Rollers are More Valuable Than You Might Think
Chances are you probably have a lint roller somewhere around your house. While these are great for getting pet hair off your clothes, they can also be extremely helpful during the spring cleaning season!
If you’d like to remove dust from your curtains or drapes, simply brush your lint roller over them. There’s no need for fancy products or struggling with a vacuum when a lint roller will suffice.
7. You Need to Clean Your Filters As Well
While they are often disregarded throughout spring cleaning, you should make sure to clean your different filters. Whether it’s your HVAC unit, furnace, dryer, or humidifier, it’s a great idea to make sure you remove all dust and dirt from them multiple times a year, but beginning the practice during your spring cleaning is a good way to make it stick in your mind!
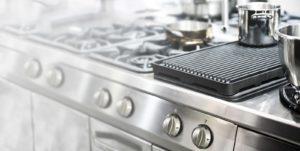
8. Cleaning Your Stainless Steel Kitchen Appliances
 Please get overwhelmed at the idea of cleaning their kitchen. From the fridge and the table to the floor, oven, and countertops, there are many individual tasks that need to be completed to consider your kitchen thoroughly cleaned. Instead, of letting this overwhelm you, tackle it like any other room.
Whether it’s your microwave, stove, oven, refrigerator, or toaster oven, you probably have at least one appliance that’s either chrome or stainless steel. Cleaning these can seem daunting, but it’s really anything but.
Simply fill a spray bottle with an equal amount of water and rubbing alcohol. Spray it onto your stainless steel surfaces and use a cloth to remove dirt, water spots, and fingerprints without any difficulty!
9. Clean Your Cleaning Appliances
Your annual spring cleaning is a great time to think about cleaning your home’s cleaning appliances as well. Your washing machine has had countless loads of clothes tossed into it throughout the past 12 months. You can remove the detergent residue and hard water by running 2 cups of white vinegar through an empty, hot water wash cycle.
Similarly, think about all the time your dishwasher is able to save you. Without it, you’d be spending considerably more time cleaning each individual dish and utensil by hand. You can clean your dishwasher almost identically to how you can clean your washing machine. Insert 2 cups of white vinegar into your empty dishwasher and run a hot water cycle.
The hot water/vinegar wash not only help remove buildup and residue but also helps your machines continue efficiently running for longer.
10. Coffee Filters are Great For Cleaning Electronic Screens
We all know we’re not supposed to touch our computer and television screens, but it’s inevitable that at some time, you’re going to want to physically point to something on your screen. This can unavoidably leave smudges and fingerprint marks on your screen, which can handicap your ability to clearly see what is displayed.
Of course, you don’t want to break your expensive technology, so it’s important to be especially gentle when cleaning your electronic screens. We recommend lightly running a coffee filter over the screen for a streak-free clean.
Your screens might not be at the forefront of your mind as you begin spring cleaning, but you’ll be grateful that they’re smudge-free as you sit down to unwind in front of the TV after a long day of cleaning!
11. Use This as a Chance to Begin Learning New Habits
 If you are, by nature, a more disorganized or cluttered person, spring cleaning can seem like more work than you can handle. However, if you follow our actionable spring cleaning tips and focus on one room at a time, you are sure to have success.
For those who don’t naturally clean every day, you should, first and foremost, be proud of yourself for tackling spring cleaning this year; many people will continue to ignore their mess until it’s too much for them to handle on their own. You can also use this time of spring cleaning to start learning new cleaning habits.
If you perform a thorough cleaning of your home this spring, you can begin instilling new cleaning habits into your regular routine. You may not have realized how easy and actionable some of these tasks are. You can begin implementing some of these cleaning practices on a more regular basis so that, when next spring arrives, you’ll have less of a mess on your hands, but you’ll also be ready to combat it!
12. Throw out things that you do not need!
As you are cleaning you are going to find items that you have not used in months or even years. Most of us will try to come up with an excuse for holding onto these items by saying that we can use it in a few months or will give it away to someone we know. We all know that the item is going to go back onto the shelf that it was taken off of, back in the box it was in, or left in the basement and never used. Contact the team at Junk-A-Haulics to get these items out of your house and never worry about them ever again!